Minecraft
You can now see a version of this article in print! Check out the MagPi, issue 58.
Linking appJar with Minecraft on the Raspberry Pi is super easy!
Simply import the Minecraft library and appJar library and have appJar call Minecraft functions...
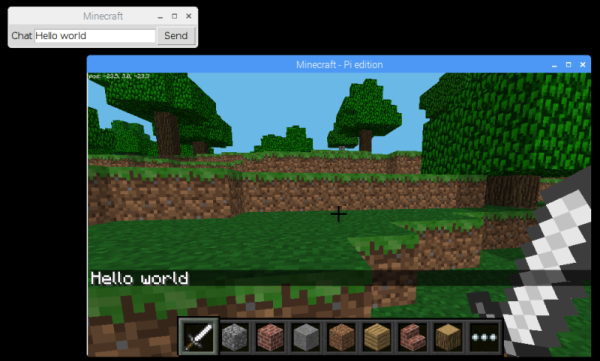
Chat
First, let's set up a simple chat entry box.
from appJar import gui
from mcpi.minecraft import Minecraft

# function to send messages to minecraft server
def sendMsg(btn):
    msg = app.getEntry("Chat")
    mc.postToChat(msg)

mc = Minecraft.create() # minecraft connection

# main GUI block
app = gui("Minecraft") # GUI

app.addLabelEntry("Chat", 0, )
app.addButton("Send", sendMsg, 0, 1)

app.go()
You can jazz this up a bit, by setting the focus and linking the
# put this in the main GUI block
app.setEntryFocus("Chat")
app.setEntryFunction("Chat", sendMsg)
app.setLocation(100,100)
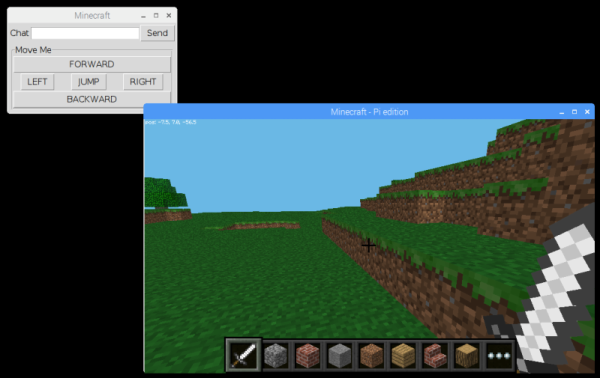
Movement
Next, let's add some movement controls...
#function to move the minecraft character
def move(btn):
    x,y,z = mc.player.getPos()

    if btn == "LEFT":
        x -= 1
    elif btn == "RIGHT":
        x += 1
    elif btn == "FORWARD":
        z -= 1
    elif btn == "BACKWARD":
        z += 1
    elif btn == "JUMP":
        y += 1
        z -= 1

    mc.player.setPos(x, y, z)

# put this in the main GUI block
app.startLabelFrame("Move Me", colspan=2)
app.setSticky("EW")
app.addButton("FORWARD", move)
app.addButtons(["LEFT", "JUMP", "RIGHT"], move)
app.addButton("BACKWARD", move)
app.stopLabelFrame()
You can jazz this up to, by linking keys up to the functions...
# add this to the main GUI block
app.bindKey("<Left>", move)
app.bindKey("<Right>", move)
app.bindKey("<Up>", move)
app.bindKey("<Down>", move)
app.bindKey("<Space>", move)

# then change the move function to register both events
# if btn == "LEFT" or btn == "<Left>" ... and so on
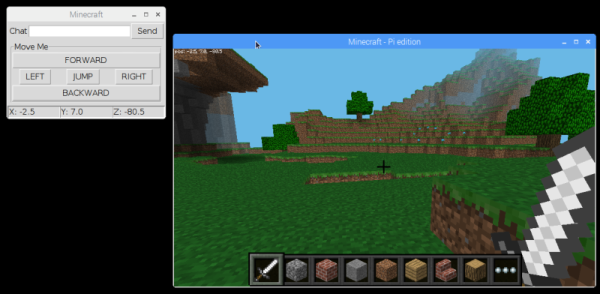
Status
Another cool feature, is a status bar that tells us where we're at...
#function to set the status bar
def getLocation():
    x,y,z = mc.player.getPos()
    app.setStatusbar("X: "+ str(round(x,3)), 0)
    app.setStatusbar("Y: "+ str(round(y,3)), 1)
    app.setStatusbar("Z: "+ str(round(z,3)), 2)

# put this in the main GUI block
app.addStatusbar(fields=3)
# call the update function every second
app.registerEvent(getLocation)
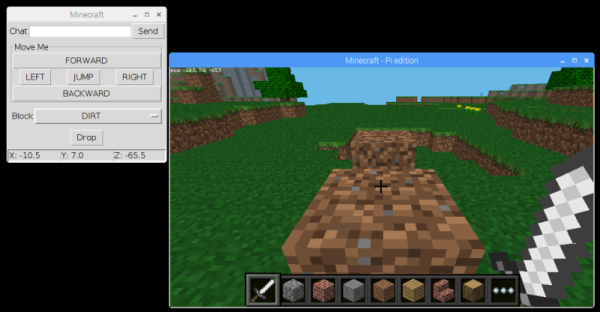
Dropping blocks
Next, let's add the ability to drop blocks.
# function to drop a block just in front
def drop(btn):
    playerBlock = app.getOptionBox("Block")
    blockId = BLOCKS[playerBlock]
    x,y,z = mc.player.getPos()
    mc.setBlock(x, y+1, z-1, blockId)

# put this in the main GUI block
app.addLabelOptionBox("Block", blockNames, colspan=2)
app.addButton("Drop", drop, colspan=2)
The issue we have is building a dictionary of block names linked to block IDs. You can try this one out, or make your own...
# put this near the top of your code
BLOCKS={ "AIR":0, "STONE":1, "GRASS":2, "DIRT":3, "COBBLESTONE":4,
    "WOOD_PLANKS":5, "SAPLING":6, "BEDROCK":7, "WATER_FLOWING":8, "WATER":8,
    "WATER_STATIONARY":9, "LAVA_FLOWING":10, "LAVA":10, "LAVA_STATIONARY":11,
    "SAND":12, "GRAVEL":13, "GOLD_ORE":14, "IRON_ORE":15, "COAL_ORE":16,
    "WOOD":17, "LEAVES":18, "GLASS":20, "LAPIS_LAZULI_ORE":21,
    "LAPIS_LAZULI_BLOCK":22, "SANDSTONE":24, "BED":26, "COBWEB":30,
    "GRASS_TALL":31, "WOOL":35, "FLOWER_YELLOW":37, "FLOWER_CYAN":38,
    "MUSHROOM_BROWN":39, "MUSHROOM_RED":40, "GOLD_BLOCK":41, "IRON_BLOCK":42,
    "STONE_SLAB_DOUBLE":43, "STONE_SLAB":44, "BRICK_BLOCK":45, "TNT":46,
    "BOOKSHELF":47, "MOSS_STONE":48, "OBSIDIAN":49, "TORCH":50, "FIRE":51,
    "STAIRS_WOOD":53, "CHEST":54, "DIAMOND_ORE":56, "DIAMOND_BLOCK":57,
    "CRAFTING_TABLE":58, "FARMLAND":60, "FURNACE_INACTIVE":61,
    "FURNACE_ACTIVE":62, "DOOR_WOOD":64, "LADDER":65, "STAIRS_COBBLESTONE":67,
    "DOOR_IRON":71, "REDSTONE_ORE":73, "SNOW":78, "ICE":79, "SNOW_BLOCK":80,
    "CACTUS":81, "CLAY":82, "SUGAR_CANE":83, "FENCE":85, "GLOWSTONE_BLOCK":89,
    "BEDROCK_INVISIBLE":95, "STONE_BRICK":98, "GLASS_PANE":102, "MELON":103,
    "FENCE_GATE":107, "GLOWING_OBSIDIAN":246, "NETHER_REACTOR_CORE":247
}
blockNames=list(BLOCKS.keys())
blockNames.sort()
Anything from the menu?
Finally, let's add a menu.
Menus work just like buttons - when you click them, they simply call a function.
So, we're going to create a function for the menus, and have it operate the camera and create/restore checkpoints:
# put this near the top of your code
def clickMenu(choice):
    if choice == "Create":
        mc.saveCheckpoint()
        app.infoBox("Save", "Checkpoint saved.")
    elif choice == "Restore":
        if app.yesNoBox("Restore", "Are you sure?"):
            mc.restoreCheckpoint()
    elif choice == "Normal":
        mc.camera.setNormal()
    elif choice == "Fixed":
        mc.camera.setFixed()
    elif choice == "Follow":
        mc.camera.setFollow()
Then we add the code to our main GUI block, to show the menus:
# put this in the main GUI block
app.addMenuList("Checkpoint", ["Create", "Restore"], clickMenu)
app.addMenuList("Camera", ["Normal", "Fixed", "Follow"], clickMenu)