Arranging Widgets
You can make your GUIs as simple or as complicated as you want...
Sequential Layout
By default, each time you add a widget to a GUI, it is simply added on a new row:
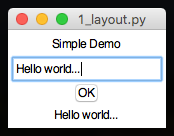
from appJar import gui

def changeLabel(btn):
    app.setLabel("l2", app.getEntry("text"))

app = gui()
app.addLabel("l1", "Simple Demo")
app.addEntry("text")
app.addButton("OK", changeLabel)
app.addEmptyLabel("l2")
app.go()
Grid Layout
If, however, you want a bit more control, then you can treat your GUI like a GRID.
Think of it just like a spreadsheet, and position your widgets in whichever cell you want.
Each time you add a widget, simply specify the row and column it should appear in (always in that order):
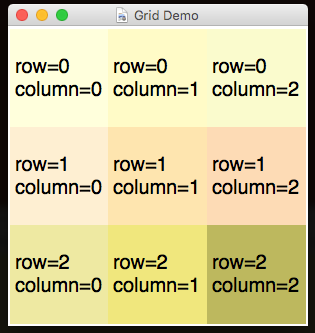
from appJar import gui

app=gui("Grid Demo", "300x300")
app.setSticky("news")
app.setExpand("both")
app.setFont(20)

app.addLabel("l1", "row=0\ncolumn=0", 0, 0)
app.addLabel("l2", "row=0\ncolumn=1", 0, 1)
app.addLabel("l3", "row=0\ncolumn=2", 0, 2)
app.addLabel("l4", "row=1\ncolumn=0", 1, 0)
app.addLabel("l5", "row=1\ncolumn=1", 1, 1)
app.addLabel("l6", "row=1\ncolumn=2", 1, 2)
app.addLabel("l7", "row=2\ncolumn=0", 2, 0)
app.addLabel("l8", "row=2\ncolumn=1", 2, 1)
app.addLabel("l9", "row=2\ncolumn=2", 2, 2)

app.setLabelBg("l1", "LightYellow")
app.setLabelBg("l2", "LemonChiffon")
app.setLabelBg("l3", "LightGoldenRodYellow")
app.setLabelBg("l4", "PapayaWhip")
app.setLabelBg("l5", "Moccasin")
app.setLabelBg("l6", "PeachPuff")
app.setLabelBg("l7", "PaleGoldenRod")
app.setLabelBg("l8", "Khaki")
app.setLabelBg("l9", "DarkKhaki")

app.go()
If you're still not satisfied, you can configure widgets to span across multiple columns or rows.
Simply provide a third & fourth parameter to specify how many rows and columns to span:
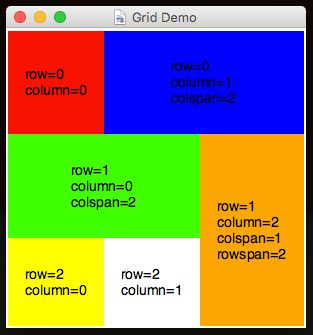
from appJar import gui

app=gui("Grid Demo", "300x300")
app.setSticky("news")
app.setExpand("both")
app.setFont(14)

app.addLabel("l1", "row=0\ncolumn=0")
app.addLabel("l2", "row=0\ncolumn=1\ncolspan=2", 0, 1, 2)
app.addLabel("l4", "row=1\ncolumn=0\ncolspan=2", 1, 0, 2)
app.addLabel("l6", "row=1\ncolumn=2\ncolspan=1\nrowspan=2", 1, 2, 1, 2)
app.addLabel("l7", "row=2\ncolumn=0", 2)
app.addLabel("l8", "row=2\ncolumn=1", 2, 1)

app.setLabelBg("l1", "red")
app.setLabelBg("l2", "blue")
app.setLabelBg("l4", "green")
app.setLabelBg("l6", "orange")
app.setLabelBg("l7", "yellow")

app.go()
Note, the parameters are read from left to right, so:
- If you're specifying a column, you must first specify a row
- If you're specifying a row-span, you must first specify both the row & column
- And, if you're specifying a column-span, you must first specify a row, column & column-span
Layout Tricks
There are a few tricks you can employ, to make life a bit easier...
Named Arguments
It can be annoying having to specify all of the positional parameters each time, so why not take advantage of Python's support for Named Arguments. These allow you to set specific parameters, using their name.
For example: app.addLabel("l1", "text here", colspan=2), will set the colspan parameter, without having to set the preceding ones.
Row Helpers
If you combine that with having appJar telling you the row you're on, things get even easier.
.getRow()or.gr()
Returns the row number currently being used.
Useful if you're mainly adding things sequentially, but want to modify one line out of sequence.
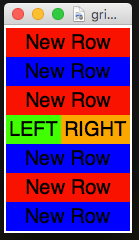
from appJar import gui

colours=["red","blue"]

app=gui()

for loop in range(3):
    app.addLabel(loop, "New Row", colspan=2)
    app.setLabelBg(loop, colours[loop%2])

row = app.getRow() # get current row

app.addLabel("a", "LEFT", row, 0)
app.addLabel("b", "RIGHT", row, 1)

app.setLabelBg("a", "green")
app.setLabelBg("b", "orange")

for loop in range(3, 6):
    app.addLabel(loop, "New Row", colspan=2)
    app.setLabelBg(loop, colours[loop%2])

app.go()
Widget Positioning
Once you've laid out your widgets, the next most important thing is how they line up in their rows and columns.
There are two things you can configure:
- How columns and rows stretch to fill the GUI - stretchiness
- How widgets stretch to fill their cells - stickiness
Note, you can also change these settings for individual widgets
Set Stretch & Sticky
.setStretch(sides)
This tells rows & columns how to stretch when the GUI is resized.
It allows them to adjust to fill the available space:none- don't stretchrow- only rows should stretch downcolumn- only columns should stretch acrossboth- stretch rows & columns
.setSticky(sides)
This determines which sides of the grid-cell the widget will stick to.
It should be a string, made up of any combination ofn,e,sorw
By default, most widgets use"ew"
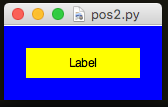
Columns & Rows Stretchiness
By default, the columns stretch (equally) to fill the width of the GUI, but rows don't - they take up the minimum space required.
It's possible to tell the rows to stretch too:
app.setStretch("both")
But, as you can see - this doesn't make much difference...
Widget Stickiness
Even if the cells in the columns & rows are stretching, the widgets inside them might not.
Widgets have a stickiness which tells them which sides of their cells to stick to.
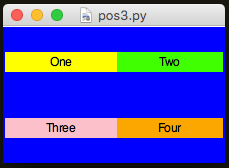
Again, widgets are configured to stick to the left & right, but not the top & bottom.
To change this, you need to set a new stickiness:
app.setStretch("both")
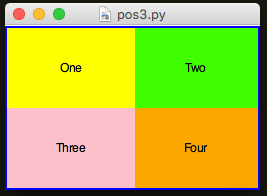
app.setSticky("nesw")
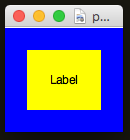
If you remove all stickiness, you end up with this:
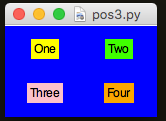
app.setStretch("both")
app.setSticky("")
It's even possible to give each widget its own stickiness:
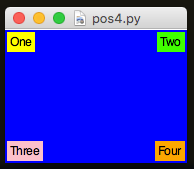
from appJar import gui

app=gui()

app.setBg("blue")
app.setStretch("both")

app.setSticky("nw")
app.addLabel("l1", "One", 0, 0)
app.setLabelBg("l1", "yellow")

app.setSticky("ne")
app.addLabel("l2", "Two", 0, 1)
app.setLabelBg("l2", "green")

app.setSticky("sw")
app.addLabel("l3", "Three", 1, 0)
app.setLabelBg("l3", "pink")

app.setSticky("se")
app.addLabel("l4", "Four", 1, 1)
app.setLabelBg("l4", "Orange")

app.go()
Widget Padding
It's possible to configure how much empty space is around a widget.
This is known as padding. You can put padding both inside and outside a widget...
app.setPadding([20,20]) # 20 pixels padding outside the widget [X, Y]
app.setInPadding([20,20]) # 20 pixels padding inside the widget [X, Y]
Set Padding & InPadding
.setPadding([x,y])This sets the X & Y padding outside a widget..setInPadding([x,y])This sets the X & Y padding inside a widget.
app.setPadding([20,20]) # padding outside the widget
app.setInPadding([40,20]) # padding inside the widget